
|
Beginners’ Guide to Telescopes |
|
Website navigation tip: On any page click on the telescope image, top right, to go back one level |
|
Overview p1 / 4 |
|
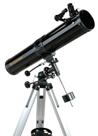
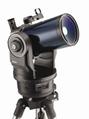
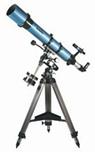
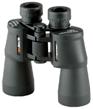
What do you need to consider when choosing your first telescope, and how much will you need to spend? It is possible to get started for under £100 but we’re going to assume you have a budget of about £250 which will give you quite a few alternatives to choose from. Here’s a bit of background and some suggestions to point you in the right direction. First, what choices do you have? For fun star-gazing your choices are broadly these – 1. Binoculars – ‘bins’ have lots of advantages for your first investment in star-gazing. Binoculars show the image the right way up (an ‘erect’ image) so you can also use them for bird-watching etc as well as astronomy. They’re very portable, extremely easy to use, reasonably robust, easily stored, and let you concentrate on the stars rather than the instruction manual and the nuts, bolts, and knobs. Bins are highly recommended as a starting point. They come in different sizes eg 10x50, where the first number (10x) tells you the magnification, and the second number (50 in this case) tells you the lens diameter in mm, generally speaking the bigger the brighter. For astronomy, people normally recommend 10x50 or bigger (but see below about image-stabilising models which are quite effective and allow use of a smaller model). Remember when holding bins in your hands you will shake and this causes the image of stars etc to jump about like sparklers, the more magnification, the more shakes. From 15x upwards you will probably need to mount bins on a tripod so losing the portability advantage. Bigger models get pretty heavy and need a tripod anyway. Image stabilisation makes a huge improvement. 2. Telescopes – You point it at the target and look through the eye-piece. Bear in mind that a serious astronomical telescope shows you an inverted (upside down) image. They all do this. It’s not a problem when you’re looking at stars and planets but you have to get used to it to move the telescope around the sky to find the target. They’re not much use for looking at terrestrial targets (birds etc) unless you fit an ‘erecting lens’ (supplied with some starter scopes). Telescopes come in different sizes, the important size quoted being the ‘aperture’ or diameter of the main lens or mirror eg 90mm. This is a measure of the light-gathering power of the scope and, broadly speaking, the bigger the better (and dearer!). You will also come across two other dimensions being quoted — (1) the focal length of the scope (eg 800mm), and (2) the focal ratio or f/number (eg f/10) which is broadly a measure of its ability to show wide bright fields of view (low f/numbers eg f/5), or support higher powers of magnification (high f/numbers eg f/12) — more later. Telescopes come in three flavours — ‘Refractors’ – contain lenses like a kid’s telescope. On a refractor you’ll find the eye-piece at the bottom (back) of the tube. Refractors are fairly light and robust and good for beginners. Go for an 80mm or 90mm refractor if you can. For a refractor the actual length of the tube will be about the same as the focal length. When you touch any telescope to move it or re-focus, it will vibrate and cause the image to jump around annoyingly for a while. Starter refractors tend to have longer tubes eg 700mm to 900mm, and so will suffer more from vibration (another reason to look for a firm mounting — see later). Refractors also suffer to some degree from an effect called ‘chromatic aberration’ which means you will likely see a fringe of false colour around the image (except with better, more expensive, optics called ‘apochromatics’ or APOs). Watch out for restricting ring baffles called ‘stops’ put deliberately inside some cheap refractors to disguise false colour fringes. You can see a stop if you look down the tube from the objective end, opposite end to the eyepiece. A stop reduces the effective aperture, making a 70mm into a 50mm for example. ‘Reflectors’ – contain mirrors. Most common are ‘Newtonians’ and ‘Dobsonians’. On these you’ll find the eye-piece at the top (front) of the tube which can be more convenient to use. The Dobsonian or ‘Dob’ is actually a Newtonian on a kind of simple mounting (see below). More experienced astronomers like reflectors because you can get more for your money (ie bigger apertures) and they don’t produce false colour fringes (chromatic aberration), but they are more fragile, and need re-alignment periodically (called collimation) — might be a bit tricky for a complete beginner. ‘Maksutovs’ (also called ‘Maksutov-Cassegrains’ or just ‘Maks’). You’ll find the eye-piece at the bottom (back) of the tube. Maks use a shorter sealed tube with both a lens and mirrors, but are more robust than reflectors, don’t produce false colour fringes, and don’t need re-alignment. They have shorter tubes than most refractors and so suffer less from vibration and are more portable. They are a good choice for a beginner but tend to be dearer. Maks are in fact one type of a class of telescopes called ’catadioptrics’ meaning they use both lenses and mirrors. The other common type of catadioptric is the Schmidt-Cassegrain or ‘SCT’. You probably won’t be able to afford an SCT on a starter budget of £250.
|
|
‘Bins’ |
|
Refractor |
|
Reflector |
|
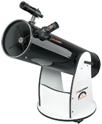
‘Dob’ |
|
‘Mak’ |
|
Overview |
